Tuesday, January 26, 2010

Sunday Supper-Pot Roast and Gnocchi


A Special Sunday Supper in Memory of
Our Tree

Pot Roast with Potato Gnocchi
*
Grated Zuchini with Parmesan
*
Brocollini with Olive Oil
*
Lemon Meringue Pudding

The majestic, two hundred year old tree that grew in our front yard was the focal point of our home.  As you drove in our driveway, the beauty of that tree made our home welcoming and elegant.  It was like losing an old friend to see our dear tree toppled over as we came home from our morning walk.  He caused no harm to our home, yard or fence as his roots gave way in the saturated soil.  He will keep our home warm for many years to come.  We will sorely miss him.

As I looked at our tree on Sunday morning, the sky still full of rain, I knew that making and cooking gnocchi was what I needed to do.  That and filling the house with the smell of a pot roast slowly simmering on the stove.  It was early Sunday morning and the kitchen was calling me.

I have made many gnocchi over the years; not all have been good.  I have read many recipes, done the trial and error thing like most of us do and eventually I learned a lot about gnocchi.  In my opinion, the trick is to use the least amount of flour you can get away with, just enough to hold them together.  It is a difficult balance, too much flour and you end the evening with a lead stomach, too little and they fall apart.  Even if you follow the recipe to a tee, you can have gnocchi that are not right.  Each potato's water content is different and may need a little more or less flour than the recipe suggests.  Two other important tips: bake your potatoes instead of boiling and after you rice them, put your dough together while they are still warm. The amount of egg is still somewhat of a mystery to me but I use a scant large egg (maybe you would call that a medium egg but I never buy medium eggs) to two pounds of peeled, riced potatoes.  My gnocchi last night were unbelievable, if I do say so myself.

I got inspiration for my pot roast by going on a few of my favorite blogs and found an Italian Pot Roast on Simply Recipes that caught my interest.  The cook learned to make this dish from a local Italian chef in her home town, Bibba Caggiano.  The braise was quite traditional and called for onions, carrots, celery, tomatoes and wine.  I added pancetta and replaced two thirds of the wine for veal stock and strained most of the vegetables out of my sauce.  The braise cooked for 3 hours and most of the flavor of the vegetables were gone but I liked the look of some carrots and tomatoes in my sauce so I cherry picked a few to place back in the broth after I reduced it.  The result was wonderful and I am grateful for my blog so I can record this gem.  How many times have I tried to recreate a recipe and my husband says, "What did you do different this time?", and he does not mean it in a good way.

I served it with a simple broccolini and a zucchini dish that is wonderful with a tomato-based sauce.  For dessert I wanted something light (in case my gnocchi were not) so I made a lemon meringue pudding.  Easy and can be made with staple ingredients in your kitchen.  A wonderful go to dessert when you are not in the mood to go back to the grocery store.  
I hope you like my Sunday Supper recipes as much as we did.

Pot Roast, Italian Style My Way


Pot Roast, Italian Style

The key to a perfect pot roast is to cook the meat until it is meltingly tender but not so much that it looses its flavor.  To accomplish this, keep your heat as low as possible and begin checking the meat at two hours.  You can use a boneless chuck roast but I think the bone adds body and flavor to the sauce.  Cooking dishes like this one makes me like winter.


  • 1 4-5 pound bone in chuck roast

  • salt

  • 2 tablespoons salt

  • 4 ounces pancetta, chopped

  • 1 large red onion, chopped

  • 2 garlic cloves, minced

  • 1 cup chopped celery

  • 1 cup chopped carrots

  • 1 14-ounce can stewed tomatoes, drained and tomatoes chopped

  • 1 28-ounce can whole tomatoes, drained and tomatoes chopped

  • 3 sprigs thyme

  • 1 bay leaf

  • 1 1/2 cups red wine

  • 3 cups veal stock

  • 2 tablespoons butter, softened

  • 2 tablespoons flour

  • salt to taste
Trim off excess fat from the chuck roast and season with salt.  Let sit at room temperature for one hour, up to two.  Heat a large saute pan over medium high heat, add the oil and sear the meat on one side until well brown.  With two tongs or a large spatula, turn over and brown the other side well.  Place meat in a large dutch oven and set aside.

Keep at least 2-3 tablespoons of fat in the pan and add the pancetta and slowly cook to render the fat and ultimately begin to brown the bacon, about 5 minutes.  Add the onions and cook for 2 minutes over medium heat.  Add the garlic and cook for 30 seconds before adding the celery and carrots; cook for two more minutes.  Add both tomatoes, the thyme and bay leaf and simmer for an additional minute.  Add the vegetable mixture to the chuck roast.  Deglaze the pan with the wine and reduce for three minutes.  Add the veal stock, bring to a boil and reduce for an additional three minutes.  Add the wine/stock mixture to the chuck roast and bring the mixture to a boil.  Lower the heat and place a parchment lid over the vegetables and meat; cover and simmer, checking periodically for three hours, or until completely tender.


When the meat is tender, turn the heat off and let the roast rest in the sauce for half an hour. Remove the meat to a bowl or large plate and set aside while you finish the sauce. Strain all of the vegetables from the sauce; set aside. Defat the sauce by pouring the broth into a fat separator, pour the broth into a saucepan. 


Reduce the sauce until full of flavor and begins to thicken.  If the sauce is not thick enough and the flavor is perfect, mix the two tablespoons of butter with the flour and add the mixture, a few teaspoons at at time into the boiling sauce and whisk.  Let simmer for a few minutes before adding more.  It will take the flour a bit of time to thicken the sauce.  You may not need all of the butter/flour mixture, use just enough to thicken the sauce to coat the back of a spoon.  You can add a few of the vegetables mixture back into the sauce to create some texture. Use a light hand, too many vegetables will reduce the flavor of the sauce.

 Now it is time to prepare the meat.  I remove the bones, sinew and fat from the meat before I reheat and slice it.  As you can see the raw meat is broken down into sections divided by the bone, fat and sinew.  Once the meat is cooked I remove all of that to leave only the good pieces of meat.  Once you slice the meat your guests will not have to deal with the inedible parts.  This is not a necessary step but a nice one and really quite satisfying to do.  I then reheat the sections in the sauce and once hot, I remove and slice them into serving pieces.  You could cook the roast up to placing the sections into the sauce and refrigerate for a few hours up to a few days.  As with any braise, the flavor only gets better as the meat sits with the sauce.  Yet, I served this up right after I cook it last Sunday and I could not imagine it any better.

I hope you try and enjoy this wonderful Sunday Supper entree, my family sure did.

Gnocchi Made Easy


Gnocchi

I used to think gnocchi were time consuming, but no longer.  Once you get the technique down they can be made for a family of four in under an hour.  The key is to add as little flour as you can to the gnocchi and boil one to see if it holds up.  It is easier to add a bit more flour than to bake another potato if you have added too much.  I cook the gnocchi ahead of time then either fry them before they get sauced  or reheat them directly in the sauce.  This makes for less last minute work.
  • 2 1/4 pound russet potatoes
  • 1 cup all-purpose flour, about
  • 1 medium egg or a scant large egg
  • 3/4 teaspoon kosher salt
Preheat the oven to 400 degrees.  Bake the potatoes until they can be pierced easily with a knife, around 50 minutes depending on the size of the potato.  Peel them while they are still hot (I use gloves) and pass them through a food mill or ricer onto a clean pasta board or counter.

Bring about 6 quarts of water to a boil.  Set up an ice bath with 6 cups of water and ice nearby.

Quickly make a well in the center of your warm potatoes and cover the potatoes with about 2/3 to 3/4 cup of your flour.  Sprinkle on the salt.  Mix your egg and add all of the medium egg or about 3/4 of the large egg in the center of potatoes.  Like you are making pasta, begin bringing the potatoes and flour into your egg with a fork.  Once the egg is mixed in, bring the dough together with your hands until a ball is formed.  Knead the dough gently for at least 4 minutes or until the ball is dry to touch.  I then test the dough to see if it has enough flour.  I take a pinch of dough, shape it into a mini gnocchi and throw it in the water for one minute.  If the gnocchi breaks up in the water, I would add 1/4 cup more flour.  If the mouth feel is too soft I would add a few more tablespoons, knead for a minute and test again.


Once you have your dough right, break off about 1/5 of the dough and roll into a rope 3/4 of an inch in diameter and cut the rope into 1-inch pieces.  I have found rolling the dough into a rope not as easy as it sounds.  Two problems happen, the dough does not roll but gets a fat edge like a block or is completely uneven like a snake that just ate a mouse.  Since a perfect dough is still somewhat sticky, I flour the board and my dough and if you are rolling your dough on a slick counter, it can slip and create a flat edge.  If this happens, pat your back, your dough is the right consistency and what you need is a rough surface (to avoid the slipping). This rough surface can be created from the gnocchi dough that was left on the counter as you kneaded (look below the dough in my picture) or from a rough cutting board.  Making an even rope takes practice but is not as much of a problem.  Just cut the fatter gnocchi into smaller pieces to keep each piece as even as you can for even cooking.  Do not worry about having your gnocchi perfect, a rustic gnocchi equals homemade.  That being said, as you gently roll your gnocchi, start from the center and and move your hands outward.  If you have a pregnant rope, stretch a bit as you roll.  Always apply light pressure to avoid the block look.  I hope that helps!

I like to cut the the rope at an angle to create a gnocchi that has two points and a fatter body but I think a straight cut is more traditional.  I then take a fork and roll the gnocchi to get some fork marks and create a little pocket to grab your sauce.

After I finish cutting and marking my rope of gnocchi, I cook it right away in the water that I have boiling.  First I salt my water like the ocean tastes, fill up my flat strainer/skimmer with the gnocchi (see picture below) and drop them in the boiling water and boil them for at least one minute or until they rise to the surface.  Mine usually rise to the surface before one minute but continue to cook them for one minute.


After the gnocchi have cooked for at least one minute, use a separate skimmer to take them out of the water and drop them in the ice water.  I have one dry skimmer to drop the gnocchi in the water and one wet one to take them out.  I then repeat the process until I am done.  Once finished with all of the dough, drain and dry the gnocchi carefully, place in a bowl, pour about 2 tablespoons of olive oil over the dumplings and toss lightly with your hand.  If you have made a light gnocchi they can be tender and could break up if you are rough with them.  Place them in the refrigerator until you are ready to use them.  They can easily be made the day before and I have held them for a few days with not much difference in taste.

You can reheat your gnocchi directly in the sauce of your choice, doing your best not to over crowd them.  I like to heat my sauce in a large saute pan then add the gnocchi in one layer and once hot, pour them directly into my serving dish.  Do not over cook them or they could turn to mush. If you have more gnocchi to cook, I would repeat the process, keeping the first batch warm in a warm oven.  I also like to fry the gnocchi to get a bit of a brown crunch on the soft dumpling.  While the taste of a crunchy gnocchi is pretty unbelievable, frying a soft bit of potato can be difficult.  I have had my beautiful gnocchi turn into a soft glob after a few minutes in the butter/oil.  The less flour you use for your gnocchi, the better they taste but the harder they are to fry.  I would test a few to see how your gnocchi handle the heat. If they turn to mush, reheat gently in the sauce. To brown mine, I heated a tablespoon of olive oil then added a tablespoon of butter.  I place the gnocchi in a single layer, gave them a shake and let them brown on one side.  Seeing they were too soft to turn with a spatula, I flipped them in the pan and gave the ones that obediently turned over for me a sear on the other side, while my bad gnocchi got a single side sear.  All in all, they were wonderful!  Please let me know if you have better luck!

Grated Zucchini with Shaved Parmesan


Zucchini with Parmesan

I was taught this recipe years ago by a San Franciscan chef.  A friend of mine bought this cooking class at a school auction and I cook a number of the recipes he taught us all the time.  Too bad I forgot who he was, I would love to thank him.  I could eat this dish as an entree with a bit of tomato sauce.  This recipe makes me plant more zucchini in my yard.

Serves 6

  • 3 tablespoons extra virgin olive oil

  • 4 zucchini, grate in a food processor creating a thick long shread

  • 1 cup shaved parmesan cheese, shaved with a grater
Heat a saute pan over high heat for three minutes.  Turn off heat and add olive oil quickly.  Immediately add zucchini and with your hand (if you are brave) turn the zucchini in the pan until it is warmed.  Add the parmesan and again quickly stir to slightly melt the cheese.  The zucchini will be just warm but not hot enough to allow the zucchini to release its water.  If you feel it is not hot enough, turn the heat on quickly.  The beauty about this zucchini is its fresh taste.  Salt to taste and serve immediately. 

Broccolini with Olive Oil


Broccolini with Olive Oil

This is the standard way I cook many vegetables.  Blanched in copious amounts of heavily salted water, Thomas Keller style.  This is my husband's favorite.  Simple but good.

Serves 6

  • Two bunches broccolini, trimmed

  • Olive oil

  • Salt
Bring a large pot of water to a boil.  Add enough salt to taste like the sea.  Make a water bath with about 6 cups of water and 6 cups of ice.  Add the broccolini to the boiling water and cook until done, about three minutes.  Take one out, cut off a bit of the stem and check to see if it's cooked.  Pull the stems out of the water and plunge into the ice bath.

Once cooked, drain and dry well.  I sometimes place them into a salad spinner to spin the water out of the heads then dry completely in a tea towel.  Place them in a microwaveable dish and season with salt and olive oil.  Toss to distribute evenly.  Taste to check seasoning.  When ready to serve heat in your microwave oven for two minutes or until hot.  Easy peasy.

Lemon Meringue Pudding


Lemon Meringue Pudding

This old fashion dessert is comfort food of the highest order.  During baking this pudding separates, forming a custard-like sauce on the bottom and a spongecake meringue top layer.  If you have a couple lemons, some butter and eggs and a few extra minutes, you have dessert!  This recipe is from Gourmet's Best Desserts, from the editors of Gourmet, a magazine of our memories.  Last night we could not help adding some warmed blueberries to this dessert.  My husband heated them in a dry pan until they burst.

  • 1/2 stick butter, softened
  • 3/4 cup granulated sugar 
  • 3 eggs separated 
  • 1/3 cup fresh lemon juice 
  • 1/3 cup flour 
  • 1 tablespoon grated lemon zest
  • 1/4 teaspoon salt plus a pinch 
  • 1 1/2 cups milk
  • pinch of cream of tartar
  • 1/4 cup confectioners' sugar for garnish if desired
Butter the souffle dish and preheat the oven to 350 degrees.

In a large bowl with a mixer cream together the butter and sugar until light.  Beat in the egg yolks, one at a time, beating  well after each addition.  Add the lemon juice, flour, lemon rind, and the 1/4 teaspoon salt and combine well.  Add the milk in a stream, and combine the mixture well.  In a bowl with the mixer beat the egg whites with the pinch of salt until frothy, add the cream of tartar, and beat until they hold stiff peaks.  Stir one fourth of the whites into the lemon mixture, fold in the remaining whites gently but thoroughly, and transfer the mixture to the souffle dish. 


Put the dish in a larger pan, add enough boiling water to the pan to reach halfway up the sides of the dish, and bake the dessert in the middle of the oven for 50 minutes, or until the pudding is puffed and the top is golden.  If desired sift the confectioners' sugar over the top.  Serve the dessert warm or chilled.

Sunday, January 24, 2010

Luncheon on the Beach


A Special Menu to Celebrate a
Beautiful Day at the Beach

With Bloody Marys and Blinis

Ahi Tuna Tartar on Wonton Chips

*
Clam Chowder

First Course

Heirloom Tomato Tart with Nicoise Olive Tapenade and Fresh Mozzarella
on a Bed of Mixed Field Greens in a Basil Vinaigrette

Entree

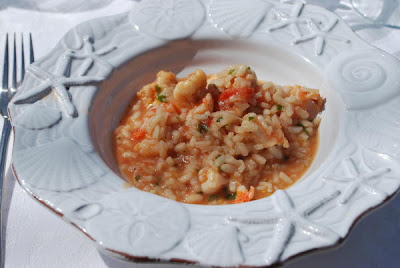
Scrimp Scampi Risotto

Dessert

Chocolate Mousse Torte


Northern California beaches are spectacular in the fall.  With the inland heat cooling and the off shore winds warming the coast, our normal fog does not have a chance to make land fall.  I always have my annual "Day at the Beach" fundraising event during this time.  It is a true community effort; the parents from my youngest daughter's class help me prep cook, set up the tables, arrange the flowers and this year, take pictures.  I need a bit of that warm sand between my toes now to get me through this wonderfully rainy weather.  We need the rain so just a little peek at these pictures along with remembering the dishes that afternoon will carry me through the wet week!

To me the beach screams fish and a luncheon says light but since I do not do "light" well, let's say "lighter".  I started with a highly seasoned ahi tuna tartar (kind of like a Hawaiian poke in small dice) on a fried wonton wrapper to get the appetite going.  I love clam chowder at the beach, so served that in coffee cups with Bloody Marys; another great combo.  For the first course I did my kid's all time favorite salad from Thomas Keller's French Laundry Cookbook.  It is like tomatoes done two ways: one roasted and hot and placed on a pastry puff pizza and the others chilled and topped with a tapenade and greens dressed in a basil vinaigrette.  For the entree I made a plain risotto and spiced it up by adding my classic shrimp scampi with tomatoes at the end along with a dizzle of olive oil, the perfect marriage.  Since I was having 16 for lunch I served my chocolate mousse torte for dessert.  It is a classic mousse in a chocolate cookie crust and feeds a crowd.

I hope you enjoy a bit of my Indian summer in the depth of winter!

Ahi Tuna Tartar on Wonton Chips


Ahi Tuna Tartar on Wonton Chips

I make this appetizer all the time and my family and friends never tire of it.  The key is to get the freshest tuna available and make sure it is sushi grade.  I scrape the meat off the white sinew, chop it up a bit and add that to my dice. You will never notice the different textures and you avoid the problem of cutting through and eating that tough connective tissue. 


Tartar
  • ½ lb. Sashimi grade Ahi tuna, sinew removed and chopped in 1/4 inch dice
  • ½ cup coarsely chopped cilantro
  • ¼ cup minced red or sweet onion
  • 2 tablespoons thinly sliced green onion tops
  • 2 teaspoons soy sauce mixed with 2 teaspoons wasabi, or to taste
  • 1 teaspoon sesame seed oil
  • 1 teaspoon peanut oil
  • 1 to 2 teaspoons lemon juice
Wonton Chips
  • 16 wonton wrappers cut in half
  • Peanut or canola oil for frying

For the Tartar:


Place your mixing bowl over a larger bowl of ice and add the tuna, cilantro and green onions; toss to distribute ingredients evenly.  Mix the soy/wasabi mixture with the sesame and peanut oil and add to the tuna; mix well.  Use the tuna cubes to wipe the bowl clean.  Right before you serve add the lemon juice and stir to evenly coat.  The lemon juice will cook the tuna and change the color from a bright pink jewel to a slight grey but the taste will not be affected.


Serve in a decorative bowl surrounded by the wonton chips or place the tuna on the chips directly for a pass around appetizer.


For the Wonton Chips:


Fill a large saute pan with at least 3/4 inch of oil; heat over medium low heat.  Throw in one wonton wrapper and wait until it turns crisp.  The key to cooking these chips is to do so over a lower heat, so they slowly cook rather than a quick deep fry.  You want the chips to be light brown and completely crisp, turning them frequently until they are the desired color and completely crisp.  I play with the heat as I cook to find that sweet spot.  Salt well while they are hot.  You also have a complete package of wontons so no worries about mistakes. 


Another techique is to bake them at 350 degrees until they are browned and crisp (my guess is around 7-10 minutes-I have not done this in a LONG time).  I first brush one side with the oil, place them close together on a cookie sheet, salt them then place in the oven for the browning.  Check frequently.  I like the looks of the baked ones but the taste is, well, not fried if you know what I mean.


Enjoy this spectacular recipe any time of year.

Clam Chowder


Clam Chowder

This clam chowder is not a typical thick version. While it does have flour to give it some body it has a thin but flavorful broth. If you like a thicker version, consider adding 1/3 cup flour to the cooked vegetables instead of the recommended ¼ cup.


For the Broth
  • 3 medium sized red potatoes, cut into ½-inch cubes
  • 1 tablespoon olive oil
  • 8 ounces bacon, cut into ¼ inch dice
  • 1 medium sized onion, diced
  • 2 garlic cloves, minced
  • 4 stocks celery, diced
  • ¼ cup flour
  • 4 cups fish, chicken or clam broth
  • 2-6.5 ounce cans clams
  • 1 cup milk
  • ½ cup cream
  • Salt and pepper to taste
  • ¼ cup chives, minced


For the Fresh Clams
  • 1 tablespoon butter
  • 1 small shallot, minced
  • ½ teaspoon red pepper flakes
  • ¾ cup dry white wine
  • 2 pounds small clams, scrubbed

Fill a sauce pan with water and bring to a boil. Make an ice bath and set aside. Salt water liberally and add diced potatoes and boil until just done, around 2 to 3 minutes. Drain and place in the water bath to stop the cooking process. Drain from ice bath, dry and set aside.


Heat your soup pan to medium low, add oil and bacon and sweat until fat is released. Continue to cook on medium-low heat until crisp; remove to a paper towel. Add onions to the bacon fat, turn the heat up to medium and cook until wilted. Add half of the minced garlic and all of the diced celery and continue to cook for three more minutes. Slowly add the flour into the vegetables and cook the mixture for an additional three minutes to take the raw taste out of the flour. Whisk in your broth, and the juice from the canned clams and bring to a boil. Turn down the heat and cook at a simmer for five to ten minutes to develop the flavors. Do not salt until you re-add the bacon.


While the soup is simmering, cook the clams. In a pot large enough to hold the clams, melt the butter over medium-high heat. Add the shallot and cook until wilted, about two minutes. Add the remaining minced garlic and red pepper flakes; cook for an additional minute. Add the wine and bring to a boil. Add the clams, cover and cook until they just open, which could be just a few minutes depending on the type of clam you have. I keep on shaking the pan and opening the lid and picking out the ones that have opened with tongs. Once all of the clams have opened, add the clam liquor to the soup pot, pick the meat out of the shells and lightly chop.


To finish the soup, add the milk, cream, reserved bacon and potatoes and the canned and fresh clams; bring to a simmer. When hot, add chives and check seasonings. I love to add a good measure of freshly ground pepper but taste before you add the salt. Season with salt if needed then serve with crackers.

Shrimp Scampi Risotto


Shrimp Scampi Risotto

Shrimp scampi is one of my favorite easy dinner party appetizers and risotto is a cinch to make as a first course.  Why not add those together for a two-in-one taste treat?  I added some tomatoes to my standard scampi recipe and folded this dish into my done risotto for one of my favorite new recipes.  This is absolutely lovely with home grown tomatoes but in the winter I would use canned.  This is a loose risotto, the way I love it.

Serves 6 to 8 as a first course

Risotto:
  • 6 cups chicken broth, Swanson is fine
  • 4 tablespoons unsalted butter, divided
  • 1 tablespoon extra virgin olive oil
  • ½ cup finely chopped shallots
  • 1 ½ cups Arborio rice
  • ½ cup dry white wine
Shrimp Scampi:
  • 3-4 tablespoons good quality olive oil
  • 1 pound shrimp with all shells removed
  • 2 tablespoons shallots minced
  • 1 teaspoon garlic minced
  • ½ teaspoon red pepper flakes
  • ¾ cup dry white wine
  • 2 cups chopped, peeled and seeded tomatoes, use canned only if you have to in the winter
  • 2 tablespoons parsley
  • Good olive oil for finishing
Bring the broth to a simmer in a saucepan.


Heat two tablespoons of butter and oil in a heavy four quart pan over moderate heat. Add the onion and sautĂ© for 1 to 2 minutes, until it begins to soften but does not brown. Stir the rice into the onion mixture; using a wooden spoon, stir for 1 minute, making sure all the grains are well coated. Add the wine and cook, stirring frequently until the wine is absorbed. Begin to add the simmering broth, ½ cup to 1 cup at a time, again, stirring frequently. Wait until each addition is almost completely absorbed before adding the next. Keep the risotto at an even, lively but low boil to ensure the proper rate of evaporation of the broth. The addition of broth should take about 18 minutes.


While cooking the risotto, make the scampi. Season the shrimp with salt, pepper and a touch of olive oil to coat. Heat pan until hot and add the 3-4 tablespoon oil (to cover the bottom of pan) then quickly add the shrimp in one layer. Do not crowd. Sear well on one side then top with shallots, red pepper flakes and garlic and stir-fry until it is almost done. Pour in wine and reduce over high heat. Push shrimp to the sides of pan to avoid them over cooking or remove them if they are cooked. Overcooked shrimp will ruin the dish. Reduce sauce until it tastes good, then season with salt and add the tomatoes and return the shrimp if you removed it. Add parsley, toss then set aside until risotto is ready.

Begin tasting the risotto after 15 minutes of cooking to determine if it is done. The timing may vary by 2 to 3 minutes on either side. You may not need all the broth or if you need more and can just add hot water. This will depend on your rice. Once done, add the scampi and stir to heat and incorporate into the rice. Serve in wide brimmed soup bowls and pour on a bit of the best olive oil you can afford.

Chocolate Mousse Torte


Chocolate Mousse Torte

My mentor, Donna Nordin, who I have been taking cooking classes from for the last 20 years, taught me this recipe. It is the signature dessert for her Southwestern restaurant in Tucson called CafĂ© Terra Cotta (which was closed a few years ago). It was also the featured dessert in Bon Appetit in 1980. It is so perfect the way it is that I have changed little. It is light yet creamy and oh so chocolatey.


Serves 12 to 16
  • 1 ½ packages (9 ounces each) Nabisco “Famous” chocolate wafers
  • 4 ounces unsalted butter, melted
  • 1 pound semi-sweet or bittersweet chocolate
  • 4 cups cream
  • 2/3 cups powdered sugar
  • 2 whole eggs
  • 4 eggs, separated
Lightly oil the sides of a 10-inch springform pan. Grind the cookies to crumbs in a food processor or blender. Mix with the melted butter and press into the bottom and up the sides of the pan. Chill.


Melt the chocolate in a double boiler over hot but not boiling water. Meanwhile, whip 2 cups of the cream with 1/3 cup powdered sugar. When the chocolate is melted, remove from the heat and add the whole eggs and yolks. Mix very well, the fold in the whipped cream.


Beat the egg whites and fold them into the chocolate mixture. Pour into the chilled crust. Chill overnight or at least 6 hours.


Whip the remaining cream and sugar and spread about half the whipped cream on top of the pie and pipe the remaining cream around the edge with a pastry bag and a star tip. Scatter a layer of chocolate curls evenly over the top of the whipped cream if you like.

Saturday, January 23, 2010

Heirloom Tomato Tart with Nicoise Olive Tapenade, Mixed Field Greens in a Basil Vinaigrette


Heirloom Tomato Tart with Nicoise Olive tapenade, Mixed Field Greens In a Basil Vinaigrette


While this recipe has many steps, they are easy and most can be done ahead of time.  You could also use a good quality store-bought tapenade without much sacrifice of flavor or even skip the tapenade all together.  I forgot the homemade tapenade one dinner party and it was still delicious!  I also like a bit of fresh mozarella or burratta on the tomatoes but this is not called for in the original recipe.  This salad is my children's favorite. 


Serves 6


Tomatoes:
  • ½ cup plus 2 tablespoons extra virgin olive oil
  • 5 medium heirloom tomatoes (about 4 ounces each), peeled
  • Salt and freshly ground pepper
  • 2 teaspoons thyme leaves
Tapenade:
  • 6 to 8 salt-packed anchovy fillets (1 ounce), bones removed, soaked in mild to cover for one hour, rinsed and then soaked and rinsed two more times
  • ½ cup (4 ounces) Nicoise olives, pitted
  • ¼ teaspoon Dijon mustard
  • ¼ cup extra virgin olive oil
Basil Vinaigrette:
  • ½ cup packed basil leaves
  • ½ cup extra virgin olive oil
  • 3 tablespoons balsamic vinegar
  • Salt and freshly ground pepper
  • ½ package Puff Pastry
  • 3 cups mixed baby lettuce leaves
For the Tomatoes


Preheat oven to 250 degrees.  Line a baking sheet with foil and coat with 1 tablespoon of the olive oil. Cut 2 of the tomatoes into 1/2 inch slices. Place the slices on the baking sheet and sprinkle with salt and pepper, the thyme leaves, and 2 more tablespoons of the oil. Roast the tomato slices for 45 minutes to 1 hour. The slices should have dried out slightly but should still be moist. These can be prepared a day ahead and stored, covered, in the refrigerator.


Slice the remaining 3 tomatoes into 1/8 inch slices and place them on a baking sheet lined with a kitchen tea towel. Season with salt and pepper and drizzle with the remaining 3 tablespoons olive oil. Cover and refrigerate for a minimum of 1 hour and up to 5 hours.


For the Tapenade


Drain the anchovies, pat them dry and place them in a small food processor with the olives and mustard. Turn the machine on and slowly add the olive oil through the feed tube to make the puree, stopping the machine and scraping the sides as necessary. Remove the tapenade to a covered container and refrigerate until ready to serve.


For the Basil Vinaigrette


Blanch the basil leaves in boiling salted water for 1 minute. Drain the leaves and cool them under cold running water; drain well and dry on paper towels. Puree the basil in a food processor. With the machine running, slowly add the olive oil through the feed tube, blending until smooth. This can be done up to 2 days ahead; store in the refrigerator, and bring to room temperature before using.


For the Puff Pastry


On a lightly floured surface, roll the pastry into an 8 by 12 inch rectangle about 1/8 inch thick. Place the sheet on a tray and place in the freezer (it will be easier to cut). Preheat the oven to 375. Line a baking sheet with parchment paper.


When the pastry is frozen, cut out 3-inch rounds of pastry and place them on the baking sheet. Prick each pastry round several times with a fork, then top each round with a slice of roasted tomato. Bake for 25 to 35 minutes or until the tops and bottoms of the pastries are crisp and they are well browned on the bottom.


To Complete


Add the balsamic vinegar to the dressing and season with salt and pepper. Toss the baby lettuce with just enough of the vinaigrette to lightly coat the greens.


Center a pastry round on each plate. Arrange 3 overlapping slices of chilled tomato on top of each roasted tomato and spoon ¼ teaspoon of olive tapenade onto the slices. Top each tart with a portion of the dressed greens and drizzle each plate with a small amount of the remaining vinaigrette.

Wednesday, January 20, 2010

Tortilla Soup on a Rainy Day!

Tortilla Soup

Tortilla Soup

*
Fried Tortilla Strips, Chopped Cabbage, Salsa Fresca, Queso Ranchero,
Avocado Cubes, Chopped Cilantro, Lime Wedges

This is the view from my kitchen window.  I love this view and have spent many wonderful hours in my kitchen cooking and looking out this window but today the sight was quite spectacular.  California is in an El Nino cycle and we are being blessed with a torrential rainstorm!  If you look in the center of this picture, the brown is a river running right through my front lawn.  It came from my driveway which was also flooded from the our mini-creek that overran its banks with the down pour.  As I looked outside at the wet landscape I thought of soup.  I had a chicken I needed to cook in the refrigerator, so it was decided, tortilla soup for dinner tonight.

I love tortilla soup.  Not only can it be made in under thirty minutes, it is a complete meal.  Kind of like a soup and salad in one bowl.  I love the heat of the soup, its spice, the melted cheese and the crunch of the cabbage and tortillas.  Everybody loves this meal because YOU get to choose the condiment for your soup.  If you do not like avocado, skip it!  The base is traditional; I learned how to make this in the home of a women in San Miguel de Allende, but the condiments are up to you.  You should at least have tortilla strips, a bit of cheese and some chopped cilantro but after that use your imagination or whatever you have in your refrigerator!

I took the time today, in this rainy weather, to make my own stock from the whole chicken I had but you can also buy a rotissere chicken from your local supermarket and use Swanson canned broth without much compromise in taste.  Make extra, it freezes wonderfully and then all you need to do is prep the condiments!
Enjoy the recipes below!

Tortilla Soup


Tortilla Soup

What makes this 30-minute soup so special are the condiments that are served with the broth.  Be adventurous and use this recipe as your platform.  Consider adding freshly cut corn, black beans, cubed zucchini or sliced Serrano chiles.  While I recommend frying your own tortilla strips, to save time, crumble in good quality, store bought tortilla chips instead.

Serves 6

1/4 cup vegetable or peanut oil
1 white onion, chopped
1 clove garlic, minced
1 teaspoon Chipotle chili powder, or to taste
1 teaspoon Chipotle abobo sauce (from canned chipotle chilis), optional
1 teaspoon chili powder
1/2 teaspoon dried Mexican oregano
3 cups chopped tomatoes, peeled and seeded, fresh or canned
6 cups chicken broth, divided, canned is fine (see recipe)
3 cups shredded cooked chicken

Condiments

Fried Tortilla Chips (see instructions below)
Crumbled Queso Ranchero
Grated Jack cheese
Avocado cubes
Sliced radishes
Shredded cabbage
Fresh Salsa
Chopped Cilantro
Lime Wedges

Warm the oil in a saucepan over medium heat; add onion and garlic and saute for three minutes.  Add Chipotle chili powder and continue to cook until onion is translucent, about three more minutes.  Add tomatoes and cook for two minutes. 

Add one cup of broth and bring to a boil.  Turn off heat and let cool.  Blend the soup base until well pureed.  Place back into the saucepan and add remaining broth.  Add chicken and reheat.

For serving, place condiments in decorative bowls.  Let each individual place their chosen toppings into their bowl.  Ladle hot soup over condiments and enjoy.


Tortilla Strips

10 corn tortillas
Canola or peanut oil for frying

Cut the tortilla in half then cut the halves into strips.  Heat the oil to 350 degrees or until a strip starts to sizzle and crisp.  Add in a handful of strips into the oil and cook until crisp, about 3 minutes, stirring periodically.  Remove from oil onto a papertowel or a rack over a cookie sheet.  Salt while hot.  Repeat until tortillas are done.  May be done earlier and stored in an airtight container after the strips have cooled.